


1stly, to all my faithful blog readers, a big thank you to all who've taken some time to encourage me to the improve the quality of pictures i'm posting here, so please do post more comments if possible. Terima kasih!
Yesterday was thinking of visiting the sand art installation at Docklands, but ended up doing some long exposure shots instead. i lugged the 7-14, 14-50. 35-100 & K's manfrotto in my lowerpro 200AW. No wonder my shoulders hurt the day after!
 i'm trying out some action presets on both lightroom and PS to see which one is more suitable for my PP style.
 cute dog.. if only C would see this :p
(btw i regard small toy dogs as pets for bimbos - small, noisy, picky and a hassle to keep!)
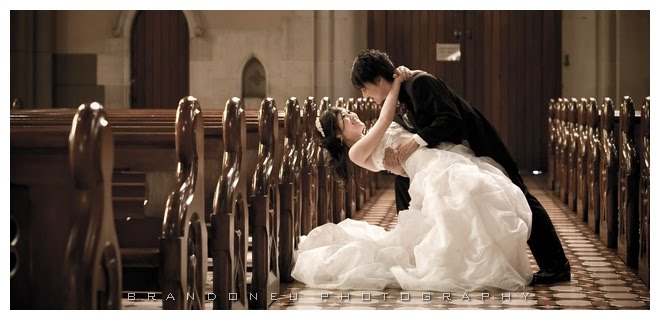
i like the effect of Kevin Kubota's B n W film grain here. too bad there's not a quick way to apply vignette's in PS, so i applied it in Lightroom before exporting it to PS.
 i tried to keep this guy on the left as a dominant point of interest, i'm not sure if i've done it right here.
 35-100 @ f2. even though its not as apparent as a FF slr, the slight blurriness of the background is still apparent.
 i then took out the 7-14. the fresh, vibrant, polarised skies give me a fresh outlook on why i got this lens in the first place. i love it!
to those who have the 9-18, its a crikey lens, but i'd pay more for slightly better image quality, plus weather-sealing, of course
 a kid came running through the 'archway'. excellent!
 4 on a bench, from a punjab family, i presume
 trying to shoot into the sun. not too mch flare, thankfully
 trying a new perspective with the sculpture and the ever present telstra dome
 somehow the position of the mound and the NAB make this an interesting photo, imho.
 the boat sculpture in docklands.
 the web bridge. this is my first time photographing it 'seriously'. some HDR stuff below to have a look at
 the apartments with the boat waterfront. i reckon if i did a panoramic view, it would've been perfect
 a tried a hdr version of this, but the bright orange color of the bridge made it a little too 'cartoonish' for my taste.
 i like the silhouettes here.
 the colors in the hdr version were a bit too rich for me, so i'll stick to the original for the moment
 with a tint of sunlight at the horizon, its easy to get rich colours here. applied a bit of exposure compensation on the boats using the brush tool in LR.
 this is the most even histogram among all my long exposure shots. smooth water always lends an ethereal effect to it.
 okay.. i salvaged this from an underexposed shot. why couldn't i use the others? the boat of course bobs up and down according to the current, and it ruins the shot... argh.. what a dummy i am. better use higher iso next time.
 again, i wanted to use the hdr version, but it lost a lot of contrast and had many coloured specks. maybe its a 'lost pixel' issue with the sensor? i'm not sure.
wished oly had a nice 12mm PC lens. it would've been perfect and saved me some photoshop work making the vertical straight!
 another careless thinking.. the floats also moved in the current, so i couldn't make a successful hdr out of this even if i wanted to.
 an interesting composition with the city skyline and railway tracks. i shall come back next time for a 'proper' shot. the skies are too dark to differenciate the melbourne skyline.
ok.. now time for the HDR section (pic credited to biofos.com)
 iso 100 - for the best quality noise-free pics
aperture - f8. this aperture gives the best DOF before lens diffraction kicks in. no point using f22. the exposure becomes too long, plus its not worth your time either.
exposure - i use the auto-bracketting function, which gives 3 photos at -1, 0 & +1ev. other options (eg. 5 exposures at -0.3 apart) takes a little long to perform, so i'm not sure if it does justice to make a better, smoother gradation on the pic.
white balance - i usually leave on auto, but setting it an a set value (around 4000K) is better
'natural' picture mode - i can always bump up saturation in lightroom.
single shot, 2 second timer, with 1 second mirror lockup. - for the ultimate rocksolid shots. its better to turn off IS also, sometimes IS can interfere and produce some 'funny' results
ESP metering.. this will usually produce well exposed shots
S-AF with all focus points 'on' to ensure everything is sharp for the first shot, then MF for the 2nd and third ones.
RAW format - yes... it take space.. (even I am stressed even though i have close to 2 TB of hard disk storage), but it gives the best DR and latitude for post processing.
gradation - i'd change it to 'normal', since auto gradation gives lots of unwanted noise (epecially in shadow areas when i'm merging the exposures).
note - these settings are specifically for tripod HDR work for the Olympus E-3.
no tripod, no worries ! .. just find a flat solid surface to rest your camera on!
whew.. thats a lot of factors to consider yeah? not to worry, save these presets under one of the custom user modes in your E-3, and you will automatically switch to them!
Now onto the pics...
 perhaps i should tune the orange tint for the buildings a little. oh well :s
 the red 'barrier' and the smooth curve of the bridge just ties everything in perfectly.
 without HDR, i would not have gotten shadow details from the footpath.
 someone said that this pic sorts of gives a 'robotech' feel. i agree.. somewhat! :p
 the hdr version gives richer colours over the former, so i'd chose this one.
i've got a housemate leaving in 2 days back home. he's one of the most important figures in my photographic journey since i've started, so it'll be a sad time to see him leave..i could never thank him enough for what he's thought me.. sigh.
sorry for the lengthy post. laters!

0 Comments:
Post a Comment